

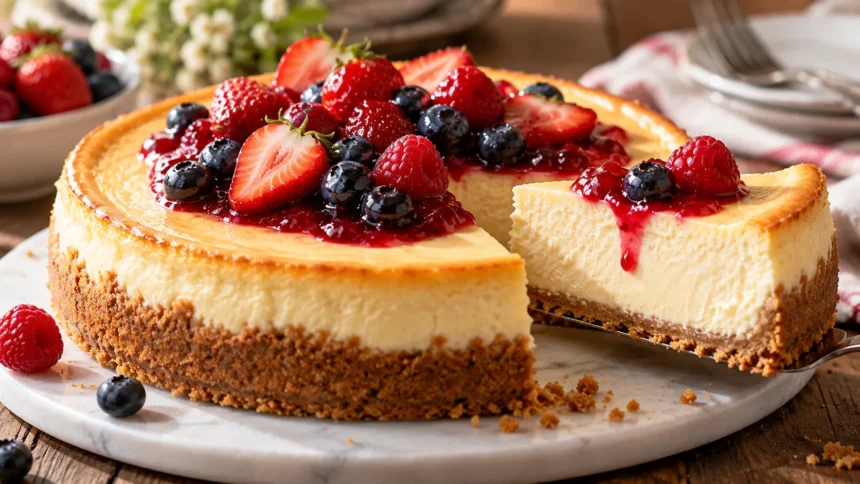
Nothing compares to the rich, creamy texture of a perfectly baked homemade cheesecake. With its buttery graham cracker crust, smooth cream cheese filling, and delicate sweetness, cheesecake is one of the most loved desserts around the world. Whether you are preparing a birthday celebration, family gathering, or weekend treat, making cheesecake from scratch can be surprisingly rewarding.
Learning the best homemade cheesecake recipe does not require professional baking skills or complicated ingredients. The secret lies in using quality cream cheese, mixing the filling gently, and following the correct baking and cooling techniques. This beginner-friendly guide explains how to make classic New York-style cheesecake, prevent cracks, achieve a silky texture, and customize your dessert with delicious toppings.
Why This Is the Best Homemade Cheesecake Recipe
The best homemade cheesecake recipe creates a beautiful balance between rich creaminess, gentle sweetness, and a slightly tangy flavor. Unlike overly dense desserts, a well-prepared cheesecake should feel smooth and velvety with every bite. This recipe combines full-fat cream cheese, sour cream, eggs, and vanilla to create a classic dessert with a satisfying texture.
Another advantage of this easy cheesecake recipe is that it uses familiar ingredients available in most grocery stores. You do not need unusual baking products or advanced equipment to achieve excellent results. A springform pan, mixing bowl, electric mixer, and basic kitchen tools are enough to prepare a cheesecake that looks and tastes impressive.
This classic baked cheesecake also provides plenty of opportunities for customization without changing the entire recipe. You can serve it plain, add fresh berries, or finish it with caramel or chocolate sauce. Once you understand the basic preparation method, creating different cheesecake flavors becomes much easier and more enjoyable.
Ingredients for the Best Homemade Cheesecake From Scratch
For the graham cracker crust, you will need 1½ cups (150 grams) finely crushed graham cracker crumbs, 5 tablespoons (70 grams) melted unsalted butter, and 2 tablespoons (25 grams) granulated sugar. These ingredients create a slightly sweet, buttery base that complements the creamy filling. The crust should hold together when pressed without becoming excessively greasy.
For the cheesecake filling, gather four 8-ounce packages (907 grams total) of full-fat cream cheese, 1 cup (200 grams) granulated sugar, and 1 cup (240 grams) sour cream. You will also need four large eggs and 2 teaspoons vanilla extract. These ingredients produce a rich, smooth filling suitable for a 9-inch springform pan.
Add 1 tablespoon cornstarch to help stabilize the filling and reduce the likelihood of cracking during baking. You may also include 1 tablespoon fresh lemon juice for a brighter, slightly tangy flavor. This recipe makes approximately 12 to 14 servings and requires about 25 minutes of preparation, followed by baking, cooling, and refrigeration.
Choose the Right Cream Cheese and Dairy Ingredients
Cream cheese is the main ingredient in homemade cheesecake, so choosing the correct variety makes a significant difference. Full-fat block cream cheese generally produces a thicker, richer filling than whipped or spreadable alternatives. Lower-fat versions may contain different moisture levels and stabilizers, which can change the finished cheesecake’s texture and consistency.
Allow the cream cheese to soften at room temperature until it becomes easy to mix without being warm. Cold cream cheese often creates stubborn lumps that are difficult to remove once other ingredients have been incorporated. Softened cream cheese blends more smoothly with sugar, helping create the silky consistency associated with traditional New York-style cheesecake.
Sour cream adds moisture and a pleasant tanginess that balances the richness of the cream cheese. Eggs provide structure, helping the filling set during baking without becoming excessively firm. Use the ingredients at similar temperatures where practical, and avoid leaving perishable dairy products or eggs unrefrigerated for extended periods.
How to Make a Perfect Graham Cracker Cheesecake Crust
Begin by preheating your oven to 350°F (175°C) and preparing a 9-inch springform pan. Lightly grease the bottom and line it with parchment paper to simplify removal after baking. Combine the graham cracker crumbs, melted butter, and sugar in a mixing bowl until the mixture resembles evenly moistened sand.
Transfer the crumb mixture into the prepared pan and press it firmly across the bottom using the flat base of a measuring cup. Apply enough pressure to create an even layer without compressing the crumbs excessively. A properly formed crust should remain together when the cheesecake is sliced while maintaining a pleasantly tender, slightly crisp texture.
Bake the crust for approximately 8 to 10 minutes until it becomes lightly fragrant and appears set. Remove it from the oven and allow it to cool while preparing the cream cheese filling. Reduce the oven temperature to 325°F (163°C), which provides gentler heat for baking the cheesecake without unnecessarily drying its delicate interior.
How to Make a Smooth and Creamy Cheesecake Filling
Place the softened cream cheese into a large mixing bowl and beat it at low to medium-low speed until smooth. Gradually add the granulated sugar and cornstarch, mixing until evenly incorporated. Scrape the sides and bottom of the bowl regularly to prevent small pockets of unmixed cream cheese from remaining.
Next, add the sour cream, vanilla extract, and optional lemon juice, mixing gently until the filling becomes uniform. Add the eggs one at a time, mixing at low speed just until each egg disappears into the batter. This careful approach helps maintain a smooth consistency without incorporating unnecessary amounts of air.
Excessive mixing can create air bubbles that expand during baking and contribute to surface cracking as the cheesecake cools. Once the filling looks smooth and evenly combined, stop mixing rather than continuing to beat it. Pour the batter over the cooled crust and gently smooth the top using a spatula.
Why a Water Bath Helps Make Perfect Cheesecake
A water bath is one of the most useful techniques for baking a soft and creamy cheesecake. It surrounds the baking pan with gently heated water, helping moderate the temperature around the filling. This reduces harsh heat exposure and supports more even baking, particularly around the edges where cheesecakes can become overcooked.
To prepare a water bath, wrap the outside of your springform pan securely with overlapping layers of heavy-duty aluminum foil. Alternatively, place the springform pan inside a slightly larger solid cake pan to protect it from water leaks. Position the protected cheesecake pan inside a deep roasting pan suitable for oven use.
Carefully pour hot water into the roasting pan until it reaches approximately one inch up the sides of the protected cheesecake pan. Avoid splashing water into the filling or allowing it to enter the crust. Transfer the arrangement carefully into the oven, making sure the roasting pan sits securely on the baking rack.
How Long Should You Bake Homemade Cheesecake?
Bake the cheesecake at 325°F (163°C) for approximately 70 to 85 minutes, depending on your oven and the depth of the filling. The outside edges should appear set while the center retains a slight, gentle wobble. The cheesecake should not look liquid or move in waves when the pan is carefully nudged.
Avoid opening the oven repeatedly because sudden temperature changes can interfere with consistent baking. Instead, begin checking near the lower end of the recommended baking time. If the center still appears very loose, continue baking in short intervals until the filling is sufficiently set while remaining tender.
Overbaking is one of the main reasons homemade cheesecakes develop dry textures and noticeable surface cracks. The filling continues to firm as it cools, so waiting until the entire surface becomes completely rigid is unnecessary. Gentle baking and careful attention to doneness help preserve the rich, creamy consistency that makes cheesecake special.
How to Cool and Chill Cheesecake Without Cracking
Once the cheesecake has finished baking, turn off the oven and carefully remove the roasting pan’s hot water if it can be done safely. Leave the cheesecake inside the switched-off oven with the door slightly open for approximately 40 to 45 minutes. This gradual cooling process helps reduce sudden temperature changes that can encourage cracking.
Afterward, transfer the cheesecake to a cooling rack and allow it to cool for another 30 to 45 minutes. If the edges are sticking, gently run a thin knife around the inside of the pan to release them. Avoid leaving the dairy-rich dessert unrefrigerated for more than two hours in total after baking.
Once the cheesecake has cooled sufficiently, cover it and refrigerate for at least 6 to 8 hours, preferably overnight. Chilling allows the filling to firm completely and develop its characteristic dense, velvety texture. Removing the springform ring before the cheesecake is thoroughly chilled may damage the edges or cause the filling to lose its shape.
How to Slice and Serve Homemade Cheesecake Perfectly
A beautifully baked cheesecake deserves careful slicing to preserve its smooth appearance and creamy layers. Begin by removing the springform ring after the dessert has chilled thoroughly. If necessary, gently loosen any areas sticking to the pan before lifting away the ring, keeping the cheesecake supported on its base.
For clean slices, use a sharp knife dipped in hot water and carefully wiped dry before cutting. Repeat this process between slices to prevent cream cheese residue from dragging across the dessert. Cutting straight downward rather than repeatedly sawing through the filling helps create attractive portions with smooth, defined edges.
Serve the cheesecake chilled or allow individual slices to sit briefly at room temperature for a slightly softer consistency. Fresh strawberries, blueberries, or raspberries provide a bright contrast to the rich filling. A small amount of fruit sauce or whipped cream can also enhance the presentation without overpowering the classic cheesecake flavor.
Delicious Homemade Cheesecake Toppings and Variations
One of the best features of a classic homemade cheesecake is its versatility when adding different toppings. Fresh berry compote, strawberry sauce, lemon curd, and cherry topping can provide colorful, fruity finishes. These additions complement the creamy filling while introducing a refreshing contrast to the dessert’s rich, slightly tangy taste.
Chocolate lovers can drizzle melted chocolate or chocolate ganache over individual cheesecake slices before serving. Salted caramel sauce, crushed cookies, and toasted nuts are additional options for creating different flavors and textures. For a more elegant dessert, keep decorations simple so the smooth surface and traditional appearance remain the main attraction.
You can also experiment with the base recipe by introducing small amounts of citrus zest or suitable flavor extracts. For example, lemon zest creates a brighter cheesecake, while a little almond extract provides a delicate nutty aroma. Avoid adding excessive liquid ingredients because they may affect the filling’s structure and baking requirements.
Common Homemade Cheesecake Mistakes and How to Fix Them
One common cheesecake baking mistake is using cold cream cheese directly from the refrigerator. Cold ingredients can create a lumpy filling, even when mixed for several minutes. To prevent this problem, soften the cream cheese beforehand and scrape the mixing bowl regularly so all ingredients combine into a smooth, consistent batter.
Another frequent issue is cheesecake cracking during baking or cooling, often because of excess air, overbaking, or temperature changes. Using gentle mixing techniques and a water bath can help reduce these problems. Small cracks do not necessarily affect flavor, and a simple fruit topping can make the finished dessert look attractive.
A soggy crust can result from water entering the springform pan or from using too much melted butter. Protect the pan carefully and measure crust ingredients accurately to maintain the desired texture. If the cheesecake remains unusually soft after adequate chilling, review your measurements and baking time before adjusting the recipe for future attempts.
How to Store and Freeze Homemade Cheesecake
Proper storage helps homemade cheesecake maintain its creamy texture, pleasant flavor, and food safety after baking. Once completely chilled, cover the dessert securely or transfer individual slices into airtight containers. Refrigerate promptly at 40°F (4°C) or below, and enjoy the cheesecake within approximately three to four days for the best quality.
If you want to prepare cheesecake in advance, freezing is another convenient option. Allow the dessert to chill completely, then wrap individual portions securely with suitable freezer-safe packaging. Freeze for approximately one to two months for optimal quality, although the filling’s texture may change slightly after prolonged frozen storage.
When ready to serve, transfer frozen cheesecake to the refrigerator and allow it to thaw gradually. Avoid leaving frozen slices on the kitchen counter for extended periods because cheesecake contains perishable dairy and eggs. Add fresh fruit toppings after thawing whenever practical, as some fruits release moisture during freezing.
Conclusion
Making the best homemade cheesecake recipe is easier when you understand the importance of accurate measurements, quality ingredients, and gentle baking techniques. A buttery graham cracker crust combined with smooth cream cheese filling creates the classic dessert that cheesecake lovers enjoy. Following the right preparation steps helps you achieve rich flavor and a beautifully creamy texture.
The most important tips include using softened cream cheese, avoiding excessive mixing, baking at a moderate temperature, and allowing enough cooling time. A water bath can also support consistent baking and reduce the likelihood of noticeable cracks. Refrigerating the cheesecake thoroughly before slicing ensures that the filling develops the firm yet velvety texture associated with traditional baked cheesecake.
Whether you are preparing a special celebration or simply enjoying homemade desserts, this classic cheesecake recipe offers a delicious foundation for countless variations. Experiment with fresh fruit, chocolate, caramel, or citrus flavors to create a version that suits your preferences. With patience and a little practice, you can make a beautiful, creamy cheesecake that becomes a favorite in your kitchen.
Frequently Asked Questions (FAQs)
1. What Is the Secret to Making the Best Homemade Cheesecake?
The secret is using full-fat cream cheese, properly softened ingredients, and gentle mixing techniques. Baking at a moderate temperature and cooling gradually helps produce a smooth, creamy cheesecake with fewer surface cracks.
2. How Long Should You Bake Homemade Cheesecake?
A 9-inch homemade cheesecake generally requires approximately 70 to 85 minutes at 325°F (163°C). The edges should look set, while the center should retain a gentle wobble rather than appear liquid.
3. Can You Make Cheesecake Without a Water Bath?
Yes, cheesecake can be baked without a water bath, but it may be more likely to develop cracks or uneven texture. Gentle oven temperatures and avoiding overbaking are especially important.
4. How Long Does Homemade Cheesecake Need to Chill?
Homemade cheesecake should generally chill in the refrigerator for at least 6 to 8 hours after cooling, with overnight refrigeration preferred. This allows the filling to firm and become easier to slice.
5. How Long Does Homemade Cheesecake Last in the Refrigerator?
Homemade cheesecake generally keeps for three to four days when properly covered and refrigerated at 40°F (4°C) or below. Store it promptly and discard portions showing spoilage or questionable storage history.